While many people across the U.S. have traditionally enjoyed the perks of an urban lifestyle, some who live in more populated city limits today are beginning to rethink their current neighborhoods. Being in close proximity to everything from the grocery store to local entertainment is definitely a perk, especially if you can also walk to some of these hot spots and have a short commute to work. The trade-off, however, is that highly populated cities can lack access to open space, a yard, and other desirable features. These are the kinds of things you may miss when spending a lot of time at home. When it comes to social distancing, as we’ve experienced recently, the newest trend seems to be around re-evaluating a once-desired city lifestyle and trading it for suburban or rural living.
George Ratiu, Senior Economist at realtor.comnotes:
“With the re-opening of the economy scheduled to be cautious, the impact on consumer preferences will likely shift buying behavior…consumers are already looking for larger homes, bigger yards, access to the outdoors and more separation from neighbors. As we move into the recovery stage, these preferences will play an important role in the type of homes consumers will want to buy. They will also play a role in the coming discussions on zoning and urban planning. While higher density has been a hallmark of urban development over the past decade, the pandemic may lead to a re-thinking of space allocation.”
The Harris Poll recently surveyed 2,000 Americans, and 39% of the respondents who live in urban areas indicated the COVID-19 crisis has caused them to consider moving to a less populated area.
Today, moving outside the city limits is also more feasible than ever, especially as Americans have quickly become more accustomed to—and more accepting of—remote work. According to the Pew Research Center, access to the Internet has increased significantly in rural and suburban areas, making working from home more accessible. The number of people working from home has also spiked considerably, even before the pandemic came into play this year.
Bottom Line
If you have a home in the suburbs or a rural area, you may see an increasing number of buyers looking for a property like yours. If you’re thinking of buying and don’t mind a commute to work for the well-being of your family, you may want to consider looking at homes for sale outside the city. Contact a McLeRoy Realty agent today to discuss the options available in your area.
The health and safety of Georgians and our visitors is the highest priority for Georgia’s tourism industry.
On Feb. 28, 2020 Governor Brian P. Kemp announced a coronavirus task force to address Georgia’s preparation and response to cases of COVID-19.
Governor Kemp and the Georgia Department of Public Health (DPH) announced a daily status report page for confirmed COVID-19 cases in Georgia. This page will replace nightly press releases from the Governor’s Office and DPH and will be updated every evening at midnight to ensure accurate and regular information is provided to the public. You can view the new tool on the DPH website.
Explore Georgia is actively monitoring developments and information surrounding the virus’ potential impact on travel to and within the state.
Governor Brian Kemp has extended the statewide shelter in place order through April 30. Gov. Kemp also ordered the closing of Georgia Public Schools through the end of the 2019-2020 school year. Both orders can be seen here.
Georgia’s beaches are open, but visitors should follow CDC social distancing guidelines. Additionally, the Georgia Department of Natural Resources issued an order prohibiting the use of chairs, tents and umbrellas seaward of the ordinary high-water mark, through April 13. Full details on the order can be seen here. Ferry service to Cumberland Island has been suspended until further notice.
On April 8, Gov. Kemp signed an order to suspend short-term vacation rentals in Georgia through April 30. The term “vacation rental” means any transaction to lease or license residential property for residential or vacation purposes, facilitated by a third party or broker for 30 days or less between a corporation, partnership, person, or other entity and a private person. This order does not include hotels/motels, extended stay lodging, or campgrounds. This order does not include any vacation rental which has been fully paid and executed or agreed to before 12:00 a.m. on Thursday, April 9. Full details of the order can be seen here.
Restrictions on travel from Europe to the United States have been put in place by the federal government for the next 30 days. The official statement and details can be found on The White House website.
Travelers using the Atlanta Hartsfield-Jackson Airport can find updates and a FAQ on the airport website.
The CDC is operating public health entry screening/quarantines at U.S. airports and border crossings, including the Atlanta Hartsfield-Jackson Airport (ATL).
Due to the rapidly changing international response to COVID-19, Delta Airlines and other carriers are adjusting daily flights. For details, please refer to airline web sites.
Due to COVID-19, many of Georgia’s attractions and museums have closed or reduced hours of operations, and some events have been canceled or postponed. To ensure you have the most up-to-date information, check social media, the organization’s website or call to confirm.
All state Visitor Information Centers (VIC) will close until further notice, effective March 13. Restroom facilities at nine of the 11 VICs will remain open daily:
Augusta – I-20 West, GA-SC Line, Augusta, GA 30917. (706) 737-1446
Columbus – 1751 Williams Road, Columbus, GA 31904. (706) 649-7455
The Georgia Department of Transportation has performed a deep clean of all VIC restroom facilities and will continue with scheduled cleanings, maintaining all health and hygiene standards.
Georgia State Parks
Georgia State Parks are now enforcing that no large crowds are allowed in the parks, and visitors must stay at least 6 feet away from others in all areas. The Georgia Department of Natural Resources is currently using a small, remote portion of Hard Labor State Park as a COVID-19 patient quarantine site. For details, visit the Georgia State Parks & Historic Sites alerts page.
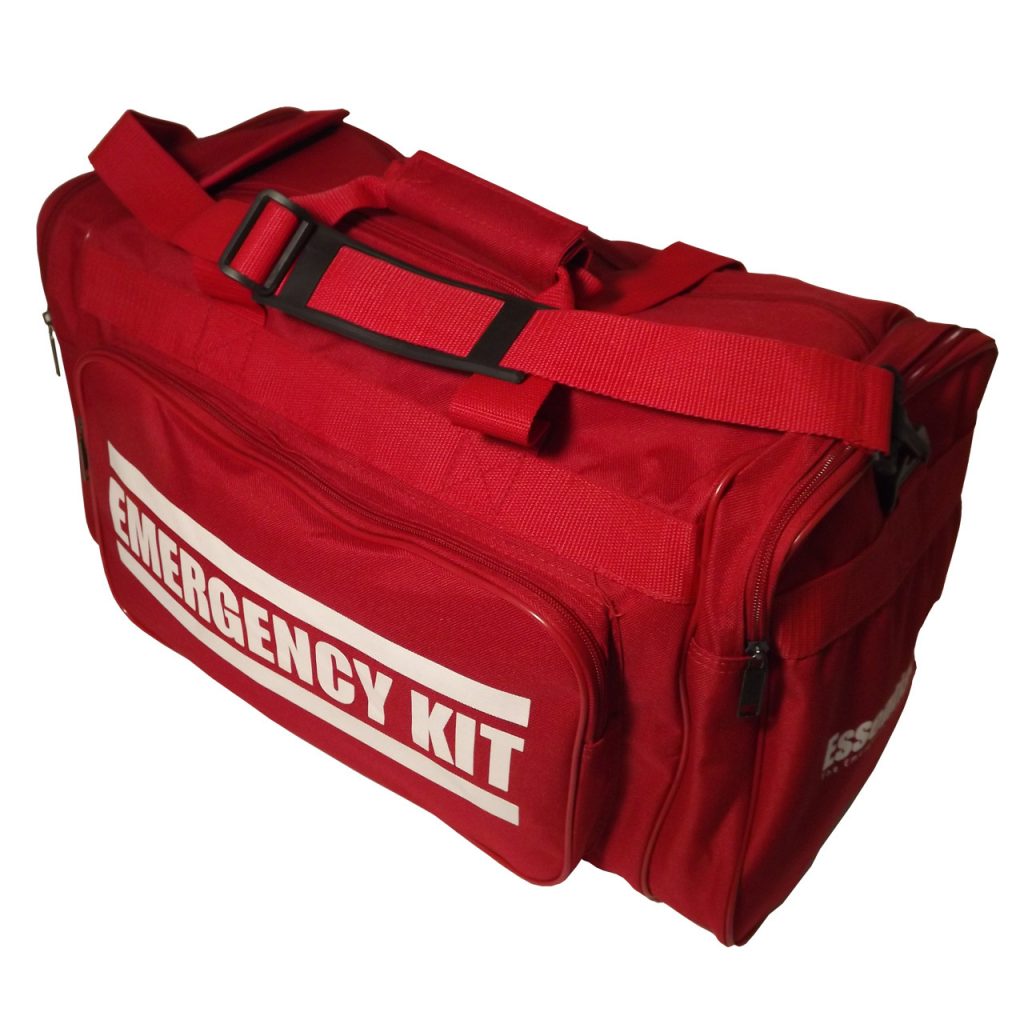
In the midst of the COVID-19 pandemic, realizing how unprepared most people are for this type of fluid situation—we thought we’d offer a few suggestions for what to include in a proper emergency kit.
Make sure your kit is stocked with the items on the checklist below. Most of the items are inexpensive and easy to find, and any one of them could save your life. Headed to the store? Once you take a look at the basic items, consider what unique needs your family might have, such as supplies for pets, or seniors.
After an emergency, you may need to survive on your own for several days. Being prepared means having your own food, water and other supplies to last for at least 72 hours. A disaster supplies kit is a collection of basic items your household may need in the event of an emergency.
Basic Disaster Supplies Kit
To assemble your kit, store items in airtight plastic bags and put your entire disaster supplies kit in one or two easy-to-carry containers such as plastic bins or a duffel bag.
A basic emergency supply kit could include the following recommended items:
Water – one gallon of water per person per day for at least three days, for drinking and sanitation
Food – at least a three-day supply of non-perishable food
Battery-powered or hand crank radio and a NOAA Weather Radio with tone alert
Flashlight
First aid kit
Extra batteries
Whistle to signal for help
Dust mask to help filter contaminated air and plastic sheeting and duct tape to shelter-in-place
Moist towelettes, garbage bags and plastic ties for personal sanitation
Wrench or pliers to turn off utilities
Manual can opener for food
Local maps (the paper kind)
Cell phone with chargers and a backup battery
Additional Emergency Supplies
Consider adding the following items to your emergency supply kit based on your individual needs:
Prescription medications
Non-prescription medications such as pain relievers, anti-diarrhea medication, antacids or laxatives
Important family documents such as copies of insurance policies, identification and bank account records saved electronically or in a waterproof, portable container
Sleeping bag or warm blanket for each person
Complete change of clothing appropriate for your climate and sturdy shoes
Household chlorine bleach and medicine dropper to disinfect water
Fire extinguisher
Matches in a waterproof container
Feminine supplies and personal hygiene items
Mess kits, paper cups, plates, paper towels and plastic utensils
Paper and pencil
Books, games, puzzles or other activities for children
Maintaining Your Kit
After assembling your kit remember to maintain it so it’s ready when needed:
Keep canned food in a cool, dry place
Store boxed food in tightly closed plastic or metal containers
Replace expired items as needed
Re-think your needs every year and update your kit as your family’s needs change.
Kit Storage Locations
Since you do not know where you will be when an emergency occurs, prepare supplies for home, work and vehicles.
Home: Keep this kit in a designated place and have it ready in case you have to leave your home quickly. Make sure all family members know where the kit is kept.
Work: Be prepared to shelter at work for at least 24 hours. Your work kit should include food, water and other necessities like medicines, as well as comfortable walking shoes, stored in a “grab and go” case.
Vehicle: In case you are stranded, keep a kit of emergency supplies in your car.
Bricks are commonly used to clad the walls of chimneys, homes and businesses. They are also a popular material for building stairs, steps, patios and sidewalks. Most brick masonry installations are held together with cement mortar between the bricks. This mortar is the “glue” that holds the whole structure together. Unfortunately mortar is also very porous, and will quickly absorb water and moisture. It is actually very common to see substantial amounts of water go completely through a brick wall or chimney and cause huge amounts of damage to the underlying walls, sheathing and insulation.
Efflorescence is also a big problem on brick. It is caused by moisture absorbing into the bricks and dissolving the natural salts and minerals inside. as the moisture evaporates from the surface, it then leaves the white powdered minerals behind. A brick sealer will greatly reduce water penetration and can often stop the effects of efflorescence completely.
Sealing your brick is easy, simple and will also protect the color of your brick while stopping water penetration into the brick and mortar. Most brick sealing is done with a high performance penetrating sealer that seals and waterproofs while leaving a completely natural sheen and appearance. These products work 100% below the surface to protect from within. They leave no film or coating on the surface, and will never flake or peel.
Brick Cleaning and Preparation
As with all projects, proper preparation is the MOST important step! Before a protective treatment can be applied, any non-compatible existing sealers MUST be removed and the surface completely cleaned and de-greased to ensure adhesion and penetration. In most cases, a thorough pressure washing is all that is needed before sealing brick that is clean and in good condition. If your brick has an existing sealer that has failed or is incompatible with the new sealer you want to use, you will need to remove the old sealer before re-sealing. Specific issues like efflorescence, rust stains or calcite should be addressed with the proper cleaners before applying any sealer or sealant.
>> Recommended Products
Foundation Armor – Concentrated Concrete and Brick Efflorescence Remover and Cleaner It is designed to penetrate and remove efflorescence from concrete, brick and masonry surfaces. It works to remove the efflorescence and prepare the surface for the application of a sealer or coating. .
F9 BARC Rust, Acid and Fertilizer Stain Remover Removes tough rust, battery acid and fertilizer stains from Concrete, Pavers, Brick, Vinyl Siding and many other surfaces. 1 Gallon.
F9 Double Eagle Cleaner / Degreaser Concentrated professional strength cleaner. Removes oils, grease and contaminates from Concrete, Pavers, Brick and many other surfaces. 1 Gallon.
F9 Efflorescence and Calcium Remover Quickly removes efflorescence, calcium, calcium carbonate and hard water stains from concrete, pavers, brick and more. 1 Gallon.
Nock-Off Industrial Coating and Sealer Stripper Easily removes concrete sealers, paints, epoxies, urethanes and many other coatings. Environmentally safe and easy to use. 1 or 5 gallons.
Penetrating Brick Sealers
This is the type of sealer we recommend for most brick sealing applications. This type of sealer penetrates deep into the surface, sealing out water and contaminates. Penetrating sealants work 100% below the surface to protect your brick and mortar from within, while still remaining breathable. These sealers do not form a film or change the sheen of the surface. Some such as WB-75 and SB-100 leave a completely natural appearance, while others like Enhancer Shield provide color enhancement for more of that “wet look” many people desire. These sealers do not become slippery when wet, and can never flake, peel or chip like film-forming sealers. These are very effective, long lasting and offer easy application and maintenance. The life-span and level of protection you get from this type of sealer will depend on the quality of the product you choose. Penetrating sealers should never be applied over an existing sealer, unless the previous sealer was a similar and compatible penetrating sealer.
>> Recommended Products
Eagle Natural Seal – Penetrating Clear Water-Based Concrete and Masonry Water Repellent Sealer and Salt Repellent Penetrating silicone sealer for your concrete. It protects concrete from salts, freeze/thaw, chemicals and other elements, featuring a combination of deep penetrating silane and surface-protecting siloxane barriers. Your concrete will bead water and look dry even when wet.
SurfKoat WB 75 Penetrating Sealer Invisible, Penetrating, Water Repellent Sealer for Concrete, Pavers, Brick, Stone and Masonry. Water-Based Silane/Siloxane. 1 or 5 Gallons.
SurfKoat Enhancer Shield Penetrating Sealer Color Enhancing, Penetrating, Water Repellent Sealer for Concrete, Pavers, Stone and Masonry. Beautifully Enhances Color While Protecting Against Water and Salt Damage. Water or Solvent-Based. 1 or 5 Gallons.
SB-100 Ultimate Penetrating Sealer Ultra Performance, Invisible, Penetrating, Water Repellent Sealer for Concrete, Pavers, Stone and Masonry. Solvent-Based Pure Silane. 1 or 5 Gallons.
Wet Look Water Based Urethane Sealers
We include this option because some customers demand a wet-look or gloss sealer for brick. If you MUST HAVE a wet-look product for your brick, this is our best recommendation. These urethanes are two-component products that chemically harden like an “epoxy” after you mix part:A and Part:B together. This makes them hard, durable and chemical resistant. Urethanes are also UV stable and will never turn yellow due to UV exposure. Since these urethanes are also water-based, they offer an easy and safe application. So far, we have only found one of these urethanes that performs to our standards, Seal-n-Lock SuperWet. SuperWet comes in a concentrate form, applies easily by sprayer, is legal for sale in all 50 states and is compatible for use over many types of existing sealers. To maintain protection and appearance, this sealer should have a maintenance coat every 3-4 years.
>> Recommended Products
Glaze ‘N Seal – Clear Wet Look Green Concrete and Masonry Lacquer Waterproofer and Sealer Green low VOC formula complies with the strictest air quality regulations. It protects and gives a fresh wet appearance to all decorative concrete, masonry, porous stone and more. The unique, proprietary deep penetrating, non-yellowing formula offers the ultimate stain protection in a high gloss finish indoors and outdoors. Ideal for driveways, patios and garage floors.
SealnLock Super Wet Paver Sealer Our Most Versatile Product! High-Performance Urethane Paver and Concrete Sealer. Extremely durable and easy to apply. 2 or 5 gallon kit. (concentrate makes up to 15 gallons of sealer!)
Like many recent hurricane victims, you may have found yourself coming back home to an unwelcome guest—flood damage. Perhaps you live in a high-risk flood zone and this is all too familiar territory, or maybe you evacuated just to be safe, never expecting to deal with any actual loss. But now that you know your house flooded, how do you start the recovery process while trying to file your claim? And what about rebuilding? Can you do it in a way that will protect your home from flooding again?
Here are some helpful tips to support you as you navigate the days ahead—from documenting damage and tackling cleanup safely to taking preventative measures.
Tips for Filing a Claim
Make the Necessary Calls:
CallFEMA: Alert FEMA of your situation by calling them at 1.800.621.3362. They may have free help available to you. (See Helpful Resources section below.)
Call Your Insurance Agent: If you have flood insurance, now is the time to call your local insurance agent. They will begin the claims process and schedule an appointment for an adjuster to come to your home. Make sure to ask the adjuster’s name before they arrive.
Document Everything:
Video: Use your phone or a video camera to do a video walkthrough, documenting damage both inside and outside of the house.
Photos: Don’t skimp on the pictures—take a bunch and make sure you get close-up, detailed shots of the damaged items before you remove them from your home.
Flooring: If larger items like carpet or flooring are damaged, cut a piece out and set it aside to show the adjuster when they come.
Keep Records: Make copies of all the paperwork you give to your adjuster or insurance agent. Use your phone to take pictures of the paperwork if you can’t make a photocopy. Keep a record of all contact with the insurance company with dates, times and details of what you discussed.
Meet With the Adjuster:
Ask for their identification when they arrive.
Be prepared to request an advance or partial payment if needed
Be ready with your policy number, insurance information and records related to any damaged belongings or property.
Request your adjuster’s email address and make sure any communication is handled by email so that you have a written record.
Do not begin any repairs without written (or emailed) approval from the adjuster.
Good to Know: If you have a large claim, you can hire a public adjuster (an independent adjuster) who will work on your behalf to mediate the claim. Watch out for potentially high fees as some states have no caps on what public adjusters can charge.
Keep in Mind That the Adjuster Will:
Take measurements and photos, noting any direct flood damage.
Provide you with a flood certification number.
Give you a suggested Proof of Loss, based on their assessment
Good to Know: The adjuster will not approve or deny your claim, or be able to tell you if your claim has been approved.
Submit Your Proof of Loss:
Review your claim before filing—making sure there are no mistakes.
Sign and submit the Proof of Loss within 60 days after the damage—the sooner the better.(1) Private insurance companies may require a shorter timeline.
File for additional payment if repair work will be costlier than expected.
If you discover additional damage, you can add to your claim after you’ve filed. Contact your insurance agent.
Keep track of where your claim is in the process.
Good to Know: Keep in mind that you don’t have to accept the adjuster’s initial estimate of the damage. If you believe the estimate does not cover your loss, file a claim for additional damages.
Watch Out For:
Robocalls: During Hurricane Harvey, many flood victims received automated calls by scammers saying their flood insurance had lapsed and had to be paid right away to ensure their coverage stayed in place. But, according to FEMA, your insurance company will not use this method of communication to warn you of a possible or imminent lapse in coverage. Instead, they will give you ample warning via postal mail—30, 60 or even 90 days before your policy expires.(2)
Scammers: Watch out for contractors who offer low bids or ask for large amounts of money up front.
Recovering from a Flood
Take Extreme Caution on Re-Entry
Follow the advice of the local authorities before you attempt to re-enter your neighborhood or home.
Do not enter the home if damaged power or gas lines are visible.
If your house looks crooked or if it appears the foundation has shifted, do not attempt to go inside.
Before going into a room, check the ceiling and floors for signs of buckling or sagging—water may have weakened them to the point of collapsing.
If you hear a hissing noise or smell natural gas or propane, get out and call your local fire department.
Do not turn power on or off, especially when standing in water.
Even if you’ve lost power, do not attempt to go into a flooded basement unless the home’s electrical meter has been removed from its socket by a qualified technician.
Protect Yourself From Potential Hazards
Assume all flood water is contaminated, unless otherwise noted by authorities.
Be on the lookout for floating or hidden debris such as glass or chemicals as well as animals like poisonous snakes.
Avoid contact with contaminated water by wearing the proper protective clothing or equipment (waders, rubber or plastic boots, gloves, etc.).
Keep your hands clean by washing them with soap and clean, running or bottled water.
If your house is contaminated with mold, you may need additional protective equipment like goggles and respirators.
Tackle Cleanup Safely
Ventilate the Area: Open all doors, windows, cabinets and drawers for adequate airflow. If the house was closed due to flooding for more than 48 hours, do this before you begin any cleanup.
Pause on Using the Power: Don’t connect a generator or anything else to the home’s electrical system unless it has been deemed safe to use by a licensed electrician.
Mitigate the Damage: If there are immediate steps you can safely take to keep additional floodwater from entering the home, such as laying a tarp or boarding up a window, go ahead and take them—but make sure to snap pictures first. If at all possible, wait until the claims adjuster has assessed all the damage to make any extensive repairs.
Be Patient With the Basement: Rather than pumping all the water out of your basement at once, remove about a third of it per day. Removing it too quickly could cause the floors to buckle and the walls to collapse.
Remove Excess Water: Remove any standing water (outside of your basement) as quickly as you can. If an electrician has given you the green light to use your home’s electricity, use fans (unless mold has already begun to grow) and a dehumidifier to remove excess moisture.
Toss the Food: Throw out any unsealed food, as well as any food that was exposed to floodwaters. Contaminated food is not worth the risk. Toss it!
Remove:
Remove any drywall or insulation (unless it’s closed-cell foam) that came into contact with floodwater, and clean the framing thoroughly—drying it as quickly as possible.
Rip out all carpets and padding that came into contact with floodwater. Hardwood or laminate flooring may be salvageable and only need to be removed temporarily. Make sure to save a sample of any ruined flooring to show your claims adjuster.
Upholstered furniture or window coverings should be tossed unless you hire a restoration company that can disinfect and deep clean them. Save a swatch of any affected fabric to show your claims adjuster.
Permanently scrap items that came into contact with floodwater that cannot be adequately sanitized.
Eliminate the Mold: Follow the EPA’s guidelines for any mold cleanup.
Sanitize Everything: Scrub and disinfect flooring, appliances and kitchen surfaces with detergent. Be careful not to mix cleaning products—harmful fumes could develop.
Examine Appliances: Have your appliances examined by a qualified technician before trying to salvage them.
Replace Outlets: Have a licensed electrician replace all outlets or switches that were submerged.
Rebuild the Right Way
Work With a Contractor You Can Trust:
Check the Reviews: Think you found a great contractor to do the repairs? Do your homework, because the first person to show up may not be the best person. Ask for multiple references and online reviews.
Ensure They Have the Right Experience: Make sure the contractor you hire is experienced in the type of repair or new construction work you need.
Protect Yourself: Don’t be fooled by an out-of-town opportunist looking to capitalize on your loss. At the very least, make sure to use reputable licensedand bonded contractors to keep your rebuild or renovation from being a nightmare.
Ask for Recommendations: Can’t find a local contractor you can trust? Ask your insurance agent or your claims adjuster for recommendations.
Get Multiple Estimates: Think the price your contractor quoted is too high? Get additional estimates from other local contractors if necessary, and consult your claims adjuster or insurance agent before you sign any contracts.
Refuse to Settle:
When it comes to work on your home, don’t accept shoddy workmanship or low-quality replacements for custom work on your house
Hold Onto Those Receipts:
Even the cost for temporary repairs should be included in the total settlement, so hold onto all your receipts—no matter how small!
Make Floodproofing a Priority:
If you’re rebuilding your home, consider building it at least 2 feet higher than what your area’s zoning requires.
If you’re repairing an existing home and you have a crawl space, basement or garage below your first floor, you can also look into floodproofing your home by adding flood openings at the base of its structure.
Another—although potentially much more expensive—option is to have your existing home elevated so that it’s above base flood elevation. You can also relocate it to a higher part of your property.
Instead of using regular insulation, use closed-cell foam insulation along with flood damage-resistant sheathing and wallboard.
When choosing flooring for the base level of your home, make sure it’s made of a nonporous material and you use water-resistant sealant or mortar.
Keep appliances like your AC unit or water heater elevated—up and away from possible flood damage.
Additional Resources
Monetary Relief: If you’re a victim of a major national disaster and do not have private flood insurance that pays for temporary displacement expenses, FEMA’s Individuals and Households Program will give you money for shelter, food or medical care as long as you apply within 60 days of the disaster.(3) To apply, go to DisasterAssistance.gov. Make sure to have your insurance information and your bank account information on hand.
Grants: For victims of hurricanes in presidentially declared disaster areas, FEMA is authorized to make grants to homeowners who do not have flood insurance under what is called the Individual Assistance Program. The grants have a $33,000 cap and are intended to provide assistance with housing as well as other serious disaster-related expenses and needs.(4) Historically, however, the grants average around $5,000.(5) Though flood victims do not have to repay the grants, they must meet certain conditions in order to receive one.
Tax Relief: If you are a victim of a disaster in a Presidential Disaster Area, be sure to ask your accountant at tax time if you qualify for tax relief from the IRS.
Flood Insurance: Are You Covered?
Before Hurricane Harvey even hit, Michael Camp—an insurance Endorsed Local Provider in Texas—was calling his customers in high-risk areas to educate them on what steps they’d need to take next, the importance of getting their claims filed quickly, and what they needed to do to document the damage.
But what if you don’t have flood insurance? Can you get covered if your house previously flooded? And what about the different types of flood insurance? How do you know which one is right for you?
Michael’s advice: “Don’t wait for tragedy to strike again. Now is a great time to go through your files, call your agent, and say, ‘You know, I never really looked at my policy. Does it cover this? What can I do to make sure this is covered, and what’s the price difference on adding flood insurance coverage?’”
Going Forward
In recent months, the entire nation has marveled as residents of cities that fell victim to flooding, and even those outside their borders, opened their homes and their hands to flood victims. Many gave (and continue to give) selflessly of their time and resources—working together to not only support their neighbors, but also to rebuild the cities they love.
We may not be able to stop natural disasters from happening again, but we can reduce our risk of them affecting us by following safety procedures, having a plan in place, and working with an insurance agent to ensure we have adequate coverage. Armed with a plan and resources, we too can be ready to put forth a strong, helping hand.
Helpful Resources:
Looking for a deeper dive into the information covered above? Here are some resources from trustworthy sources that you may find valuable.
FIRST WEEK: • Prune apple and pear trees now – but postpone peach pruning until mid-March.
• It’s dangerous to spray glyphosate (Roundup, etc) on bermudagrass, even if you think it is completely dormant. Make sure no green bermuda sprouts are near the soil surface.
• Look for blooms on your Lenten rose (Helleborus orientalis). Few other plants can supply the year-round interest of this evergreen ground cover.
• Redesign your lawn for easier mowing. Eliminate sharp angles and narrow turf areas. Use mulch, new flower beds or a groundcover like mondo grass there instead.
• Water poinsettia, Christmas cactus and amaryllis plants with houseplant fertilizer diluted to one-half strength. Don’t overwater!
SECOND WEEK: • How much fertilizer or lime does your lawn or garden really need? The only way to know for sure is to call your county Extension office (1-800-ASKUGA-1) and get a soil test kit.
• Prune one-fourth of the branches from your overgrown fig bush. Removing any more will reduce the number of fruit this summer. Concentrate on saving the horizontal ones.
• Bring branches of spirea, forsythia and flowering quince indoors. Placed in a vase, they will bloom in just a few days.
• Remember to turn houseplants 180 degrees every two weeks to prevent uneven growth.
• Remove guy wires, stakes and trunk wraps from small trees you planted last fall.
THIRD WEEK: • The brown foliage on pampas grass and maiden grass can be pruned away now. Leave only a “crew cut” of brown stems twelve inches high.
• Plant sweet pea now for fragrant flowers later. Plant English peas, onions, asparagus or elephant garlic for your spring vegetable garden.
• Overgrown Burford holly shrubs can be pruned severely now. Even if it is reduced to twelve inches tall, this shrub will resprout plenty of new foliage by summer.
• Plant a large container for your patio. A small boxwood surrounded by variegated ivy and blooming pansies would look very nice!
• Plant a winter daphne (Daphne odorum) near your home’s entrance or front walkway. The scent will greet you each day when you arrive at your abode this spring.
FOURTH WEEK: • Clean out bird boxes so they will be ready to welcome new residents in a few weeks.
• Build raised beds for vegetables, roses and herbs. It’s easy to do with four pieces of 2×8 wood planks. Choose lengths that fit your space; bolt them together at the corners.
• Reduce the size of your butterfly bush by two thirds to one half to encourage new growth (and big blooms) this summer.
• Time for the first fertilization of fescue for the year. Any brand of turf fertilizer will work well. Next application: April.
• Set your mower to its highest setting and cut off the tattered leaves of liriope (monkey grass). They will quickly regrow in March.
To rid your floor of caked-up grime and dirt, you may want to deep-clean it.
For floors with a surface finish:
Use a pH-neutral, wax-free and petroleum-free floor cleaner. You can also make your own homemade cleaning solution with few drops of dish soap and a gallon of warm water.
Wet a sponge mop with floor cleaner and wring out the excess liquid so the sponge is only slightly damp. Mop one 3-foot section of the floor using a circular motion to pull up excess dirt and then move on to the next section.
Rinse the mop using water, wring it out and continue mopping the floor to soak up the remainder of the cleaning solution. As when washing, wring out the mop thoroughly to prevent over-wetting the floor.
Dry with a soft, clean towel.
For floors with a penetrating finish:
Strip off the old wax coating.
Wipe down the floor in 2-foot sections using a clean cloth saturated in mineral spirits.
Let it sit for five minutes on each section before wiping it off with a fresh, slightly damp cloth.
Using a fresh, dry cloth, wipe away any excess moisture.
Reapply solvent-based floor wax using a cloth or an electric polisher to buff the wax into the floor.
Removing Hard Food Stains
To remove caked-on food from a floor with a surface or penetrating finish, push the tip of a plastic knife under the lower edge of the debris and slide the knife upward gently.
If your floor has a surface finish, rub the area with a clean, slightly damp cloth and follow it with a dry cloth to remove any excess moisture.
If the floor has a penetrating finish and a bit of wax coating comes up in the process, reapply solvent-based floor wax using a soft cloth and buff it in.
Cleaning Oil and Grease Stains
You can use trisodium phosphate on floors with both surface and penetrating finishes to break down oil and grease. Before using TSP, make sure to wear gloves and protective glasses.
In a large bucket, mix 2 tablespoons of TSP in a gallon of warm water. Fill a second bucket with warm water only.
With a clean cloth dipped in TSP solution, and wring it out. Gently wipe the stained area using a circular motion.
Immediately rinse away the TSP with a different cloth dampened in the plain water.
Dry the area with a clean, dry cloth.
Removing Wax, Gum and Crayon Marks
Ice works wonders on hard-to-remove debris like dried wax, crayon marks and gum for both surface and penetrating finishes.
After filling a freezer bag with ice, place it over the debris.
When it becomes brittle, scrape it off with a plastic spatula.
If the floor has a penetrating finish and a bit of wax coating comes up in the process, reapply solvent-based floor wax using a soft cloth and buff it in.
Removing Pet Urine, Ink and Water Spots
Pet urine, ink and water leave some of the most challenging stains and involve a little extra legwork, but it is not impossible to remove them. The steps below apply to penetrating finishes only. Do not use sandpaper or steel wool on floors with a surface finish. Instead, use a hardwood floor cleaner and a scouring pad made specifically for this type of floor.
Start by lightly sanding the wood with extra-fine sandpaper.
Gently scrub the area with 00-grade steel wool dampened with mineral spirits.
Wipe away the spirits using a new, water-dampened cloth.
Use a clean, dry cloth to remove any excess moisture.
Apply solvent-based floor wax (or other type of finish that matches the original) to the area with a soft cloth and buff it in.
There are an estimated 3000 home invasions per day in America alone. These simple tips could help SAVE YOUR LIFE. Please share with your friends and family.
REMEMBER THE 4Ds – DETER, DETECT, DENY, DEFEND
DETER
Make it look like someone is home. Light it up. Bad guys hate well-lit houses. https://amzn.to/2TnhObI
Make your life seem unpredictable. Kids toys on the porch, dogs. “Beware of Dog” sign (even if you don’t have a dog). Don’t let burglars and would-be home invaders get a bead on your daily routine. https://amzn.to/36MoST4
Make sure security cameras are placed properly. Best light for high-resolution images. Think it out.
Talk to your neighbors and agree to inform each other about suspicious activity. One neighbor who knows on the lookout could make all the difference.
DENY
Garage – Most burglars go through the garage door. Lock the door inside the garage that goes into the house. Most people leave this door unlocked. Trim or tie-up cable release to garage door so it can’t be hooked and disengaged.
Replace all door, lock, hinge screws with 3.5″ wood screws. Also, put 3.5 inch screws every foot or so through the door frame on the locking side. Time is precious during a home invasion and this could gain seconds in your favor. https://amzn.to/2t5DeQ5
Install protective window film. It goes on like tint and can prevent your windows from being penetrated. https://amzn.to/2t6epn4
DEFEND
Have a meeting place inside and outside the house.
Have routes (primary and secondary) to the meeting points.
Communication – Make sure everyone can communicate with each other.
* With it comes to weapons, the most important thing is to use something you’re comfortable with. Whether it’s a gun, knife, bear spray, brass knuckles, or a baseball bat—if you don’t know how to handle it properly it can end up in the bad guy’s hands.
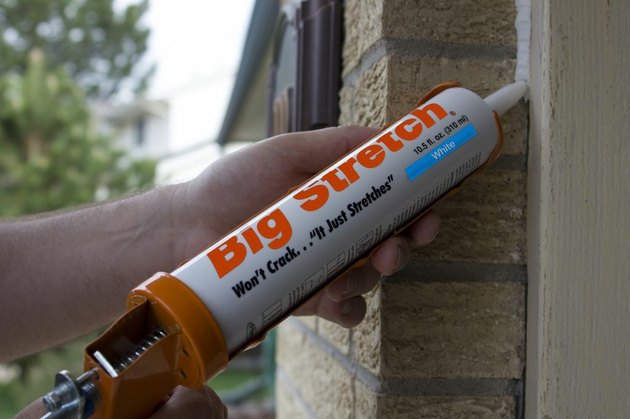
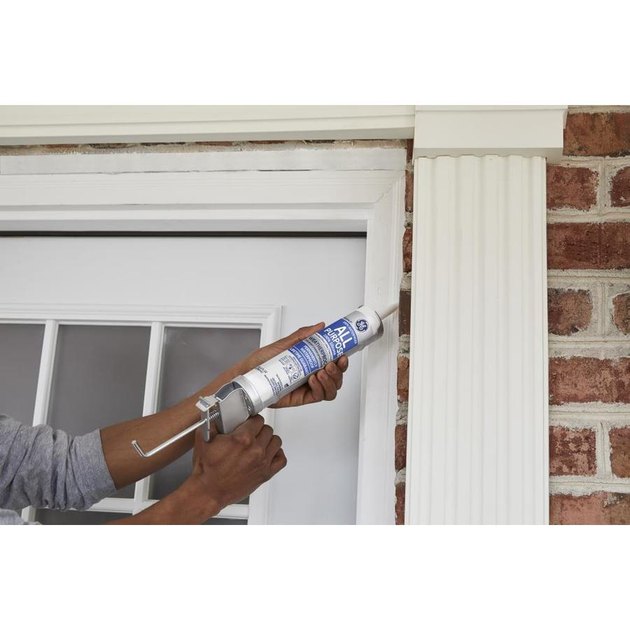
Silicone caulk stays flexible and watertight and is the best material for outdoors.
Those little gaps around your door and window frames can cost you a lot of money. They allow cold air to waft into your home, and no matter how well the walls are insulated, you’ll feel cold unless you kick up the heater a notch, which could kick up your energy bill by as much as 20 percent. And that’s in addition to damage caused by moisture attacking the wall framing if it finds its way in through those cracks. It’s pretty easy to seal those cracks with caulk, although you may need to work on a ladder, and that has its inherent hazards. To do a complete job, you should also caulk around indoor window and door frames, and because that usually doesn’t call for ladder work, it’s even easier.
Caulking does involve a certain amount of skill, but it’s a skill the average person can quickly develop. Necessary equipment includes a caulking gun, a knife, a paint scraper and some rags. You also need caulk, of course. Many types are available, so it helps to research them to determine the best for your particular purpose. In general, choose silicone caulk for exterior use and pure or siliconized latex for indoors.
Collect Supplies to Caulk Your Doors and Windows
Once you start the caulking job, it’s best to continue until it’s done without interrupting things to go to the hardware store, so make sure you have enough caulk on hand. The coverage from a tube of caulk depends on the width of the gaps you have to fill, but assuming the average gap is less than 1/2 inch wide, a single tube is enough for about three or four door or window frames. Because of the variability of gap width, you won’t find coverage listed on the caulk label, but you’ll find everything else you need to know, including the color, material, setting time, mildew resistance and best place to use the caulk. If you’re not sure how much you need, it’s better to overestimate. You can always return what you don’t use or save it for the next time.
Caulk guns vary in quality. Rather than trying to save money by going for the least expensive one, consider paying $10 to $15 more to ensure you do the best job possible with the least mess. If you have a choice between a notched and smooth plunger, choose the smooth one. It develops more pumping power, and the quick-release lever is more reliable than the one on a notched plunger. That’s why these types of guns are advertised as dripless, although they are only dripless if you remember to push the lever. Better-quality guns also have a tip-cutting mechanism and a wire rod for piercing the tube seal so you don’t have to carry around a long nail for this purpose.
Smoothing the caulk after you apply it is called tooling, and it’s an important part of the job. You can simply use your finger for this, which is why you need plenty of rags, or you can use a spoon. If you don’t mind spending an extra few dollars, you can also buy a plastic tooling tool, although it’s debatable whether this does as good a job as your finger.
Whether you’re working indoors or outdoors, you have to remove any existing caulk before you apply fresh material. If you don’t, the new caulk won’t seal properly and it will fail in a short time. You can usually get old latex caulk off with a paint scraper, but silicone caulk is more difficult to remove. You can find products that promise to soften or dissolve silicone and make it easier to remove, but in many cases, you’ll end up cutting a significant portion of the old caulk off with a sharp knife. It’s a tedious job, but you have to do it. Clean up all the loose specks with a damp rag when you’re done.
If your caulk gun has a cutter, simply insert the tip into the hole in the handle of the caulk gun as far as it will go and pull the trigger. Otherwise, use a utility knife to cut the tip off the tube. It’s best to cut at a 45-degree angle about a third of the way from the tip. This reduces mess: The size of the opening ensures the bead isn’t too large and the angle guarantees that all the material flows into the gap you’re filling. Once you’ve cut the tip, insert a nail or the rod on your caulking tube to break the seal, insert the tube in the gun, pull the trigger a few times until the rod contacts the plunger on the bottom of the tube, and you’re ready to go.
Tips for Efficient Caulking
Once you get the hang of caulking, you’ll find it to be a fairly effortless activity. In fact, the less effort you expend, the better is the job you’ll do. At first, though, you may have to get used to the rate at which material exits the tube so you can adjust the speed with which you draw the gun along the crack. This is why it’s a good idea to start in an inconspicuous spot, such as the top of a door or window frame. Always draw the tip away from the material you just applied. If you push into it, you’ll just get an unsightly and problematic build-up of gooey material.
Whenever possible, apply a bead in a single continuous motion from one end of the gap to the other. Keep steady pressure on the trigger to maintain a uniform flow of material. If you miss a spot or you have to fill a large gap, finish the bead, then go back and apply more in the places that need it. Don’t forget to press the release lever every time you finish a bead. It’s a good idea to wrap a rag around the tip to catch any material that falls out.
Tool each bead as soon as you finish applying it. Simply run your finger—or whichever tooling implement you choose—over the fresh caulk in a single, continuous motion, then wipe the excess material off your finger or the implement with a rag. When you’re using latex caulk, it’s a good idea to keep the rag damp, but use a dry rag when applying silicone, butyl or any other material that isn’t water soluble.
Your wrist may be sore from signing two inches of mortgage documents, but the real fun begins now! You need to transfer your family’s medical records, host a garage sale, discontinue the utilities — oh, and pack up all your earthly possessions and get them from Point A to Point B. It is possible to get it all done without losing your cool: Follow our 8-week timeline to get from “We’re moving!” to “We’re home!”
8 Weeks Before
Sort. Walk through every room and open every drawer; decide what to take to your new home and what to get rid of. Make a list of “keep” items that will require special packing or extra insurance coverage.
Purge. Donate items you no longer want, or host a yard sale.
Hire movers. Research moving companies. Always ask for the mover’s U.S. Department of Transportation license number; whether the company is bonded; and whether the company is licensed for interstate moves, if you’re moving out of state. Request in-home estimates to receive the most accurate pricing.
Contact your children’s school. Notify the school that you’re moving, and obtain copies of your children’s records. Contact new schools for enrollment and record-transfer procedures.
6 Weeks Before
Make travel arrangements. Book hotel stays if you’ll need lodging on the road or before your new home’s ready; book any necessary flights.
Order packing supplies. Purchase standard boxes in various sizes; bubble wrap; packing paper; packing tape; and specialty containers, such as wardrobe and dish-pack boxes.
Contact your doctors. Obtain copies of medical records for all family members, or have the records sent to your new physicians. Haven’t found new ones yet? Ask your current doctors for recommendations.
Contact insurance agents. Find out whether your move necessitates changes in your medical, dental, vehicle or personal property insurance.
4 Weeks Before
Start packing. Begin with items you use only rarely or seasonally (e.g., fondue pot; pool toys); save items you use frequently (e.g., TV remote; your toothbrush) until just before moving day. Snap photos of valuables and pack them separately; you’ll carry those items with you.
Label, label, label. Mark each box with its contents and the room it’s destined for in the new house. The only exception: Don’t list contents on a box that contains valuables, to avoid theft.
Inventory. Keep a running list of each packed box, its contents and what room it belongs in. Later, you can match this against your moving company’s inventory sheet.
Measure. Ensure that all of your belongings can make it out of your old home and into your new one; measure any tall, wide or oddly shaped items, as well as any doorways or tight spaces they’ll need to fit through, so there are no surprises on moving day.
Update your computer. Download any necessary software updates and ensure that all of your files and photos are backed up to an online cloud storage service or an external hard drive that you’ll carry with you.
Make arrangements for pets. Book a pet sitter or care facility for moving day. If you’re moving out of town, make travel plans for your furry friends and ensure your veterinarian has authorized your pets for the journey.
Contact utility companies. Instruct existing utilities to disconnect services the day after your move; direct new utilities to install services at least a day before you arrive.
Consider storage. If your new home won’t be ready when you leave your old one, research storage options in your new community.
Clear the freezer. Start using up frozen food items that will be a hassle to move. Then, tackle the pantry and fridge.
Visit an auto mechanic. Get an oil change, tire fixes and any necessary tune-ups to ensure that your car survives the move.
Change your address. Visit USPS.gov or your local post office to officially change your address. Leave your forwarding address with a neighbor, just in case.
Alert important parties. Notify your employer, banks, credit card companies, subscription services, friends and family of your move.
2 Weeks Before
Confirm the movers. Contact the moving company and double-check your plans. Make sure the insurance in place is enough to cover your valuables.
Clear out. Empty out storage units, safe deposit boxes and any other off-site storage spots. And don’t forget to pick up your dry cleaning.
Take time off. Evaluate how many work days you’ll need to make the move, and then request time off from your employer.
Clean the rugs. Have area rugs cleaned; they’ll arrive rolled and wrapped from the cleaner, ready to unroll at the new house.
Pay it forward. As you pack, gather warranty information, manuals and other house-specific information in a binder for the new owners.
1 Week Before
Finish packing. Aim to complete the general household packing a couple of days before moving day.
Pack your bag. Your last bag should contain at least one change of clothes — or more, if you’re moving out of state — for each person in the family, as well as all of the basics (e.g., phone charger, toilet paper) you need to survive for a few days without the items on the moving truck.
Visit the pharmacy. Refill any prescriptions you’ll need for the next month, and arrange to transfer prescriptions to a pharmacy in your new community.
Unplug. Disconnect and clean any large appliances (e.g., washing machine, fitness equipment) you’re moving; contact a professional to disconnect gas lines. If you’re moving your fridge, defrost the freezer and clean it at least a day before you move.
Make your last donation. Arrange for a final pickup of all remaining items in your “donate” pile.
A Few Days Before
Confirm the movers … again. Triple-check arrangements with the moving company. Verify how much you’ll owe on moving day, and what forms of payment are accepted. Ask for a cellphone number for the day-of contact, and confirm the crew’s arrival time. Prepare written directions to your new home and hand them to the movers on moving day.
Get the keys. Arrange to receive the keys to your new home, or schedule the realtor or landlord to meet you on moving day.
Donate food. If you’d rather move fewer boxes, donate nonperishables to a local food pantry.
Disassemble furniture. Place screws, brackets and fasteners in a small plastic storage bag, and label it. Even better: Tape the bag to the furniture’s underside.
Get rid of it. Most movers prohibit moving boxes that contain paint, aerosol cans, matches, alcohol and other chemicals. Properly dispose of these items, or plan to move them yourself.
The Don’t Pack List
Keep these items off the truck and close to you on moving day:
Important documents (e.g., passports, marriage license, birth certificates, any records containing bank account information or Social Security numbers)
Checkbook
Credit cards
Medication
Phone and charger
Laptop and charger
Toilet paper
A change of clothes (one for each member of your household)
Snacks and water (for kids and pets)
A child’s special toy or blanket (if they can’t bear to pack it)
Jewelry
Flashlight
Tape measure
Toolbox
Trash bags
Paper towels
Cash
Any other valuables, heirlooms or irreplaceable items
Moving Day
Current Home
Say goodbye. Take time to say a proper “so long” to your old house before things get hectic. Children, in particular, benefit from some closure: Walk through the house recalling fond memories you have, and talk about what fun you’ll create in your new home.
Meet the movers. Greet the moving crew and ensure that all workers are representatives of the moving company you hired. Be sure the moving truck’s U.S. Department of Transportation license number is the same as the number on your estimate.
Supervise the load-in. Assign a helper to watch the moving crew stack your belongings inside the truck, keeping an eye out for damage.
Clean the old house. Tidy up rooms as the moving crew empties them, or consider hiring a cleaning service.
Keep valuables with you. Be sure the movers don’t mistakenly load boxes containing your laptop, jewelry, passports and other irreplaceables you should keep near you at all times.
Make a final walk-through. Lock your old home’s windows and doors, turn off lights and ceiling fans and make sure nothing’s left before you leave for good.
New Home
Roll out the carpet protector. Lay down plastic carpet protector at the new house, if your movers haven’t already done so.
Show the moving crew around. Point out specific rooms so boxes end up where they belong.
Watch for damaged and missing items. Your movers will make an inventory sheet, called the “bill of lading,” that notes the condition of your items, including damage to any boxes or furniture.
Pay the movers. Complete the transaction using the payment method you agreed to when you confirmed the move. If the moving crew did a good job, a tip of 10 to 15 percent of the total fee is customary.
Get it in writing. Before the movers leave, sign the inventory sheet — and make sure the mover in charge signs it, too. Get a copy for your records.
Do an initial clean. Vacuum and mop floors before you set down furniture; wipe down countertops; and do a deep clean of tubs, showers and toilets.
Assemble furniture. Grab your toolbox and start reassembling furniture; don’t wait until your helpers have gone home.
Start unpacking. If you notice any damage to your boxes, set them aside until the moving company can return to inspect them. Take photos of the damage for your records.