Month: December 2019

December 30, 2019

Caulking Windows & Doors

Caulking exterior window frame.

Silicone caulk stays flexible and watertight and is the best material for outdoors.

Those little gaps around your door and window frames can cost you a lot of money. They allow cold air to waft into your home, and no matter how well the walls are insulated, you’ll feel cold unless you kick up the heater a notch, which could kick up your energy bill by as much as 20 percent. And that’s in addition to damage caused by moisture attacking the wall framing if it finds its way in through those cracks. It’s pretty easy to seal those cracks with caulk, although you may need to work on a ladder, and that has its inherent hazards. To do a complete job, you should also caulk around indoor window and door frames, and because that usually doesn’t call for ladder work, it’s even easier.

Caulking does involve a certain amount of skill, but it’s a skill the average person can quickly develop. Necessary equipment includes a caulking gun, a knife, a paint scraper and some rags. You also need caulk, of course. Many types are available, so it helps to research them to determine the best for your particular purpose. In general, choose silicone caulk for exterior use and pure or siliconized latex for indoors.

Collect Supplies to Caulk Your Doors and Windows

Once you start the caulking job, it’s best to continue until it’s done without interrupting things to go to the hardware store, so make sure you have enough caulk on hand. The coverage from a tube of caulk depends on the width of the gaps you have to fill, but assuming the average gap is less than 1/2 inch wide, a single tube is enough for about three or four door or window frames. Because of the variability of gap width, you won’t find coverage listed on the caulk label, but you’ll find everything else you need to know, including the color, material, setting time, mildew resistance and best place to use the caulk. If you’re not sure how much you need, it’s better to overestimate. You can always return what you don’t use or save it for the next time.

Caulking a door.

Caulk guns vary in quality. Rather than trying to save money by going for the least expensive one, consider paying $10 to $15 more to ensure you do the best job possible with the least mess. If you have a choice between a notched and smooth plunger, choose the smooth one. It develops more pumping power, and the quick-release lever is more reliable than the one on a notched plunger. That’s why these types of guns are advertised as dripless, although they are only dripless if you remember to push the lever. Better-quality guns also have a tip-cutting mechanism and a wire rod for piercing the tube seal so you don’t have to carry around a long nail for this purpose.

Smoothing the caulk after you apply it is called tooling, and it’s an important part of the job. You can simply use your finger for this, which is why you need plenty of rags, or you can use a spoon. If you don’t mind spending an extra few dollars, you can also buy a plastic tooling tool, although it’s debatable whether this does as good a job as your finger.

Tooling new caulk.

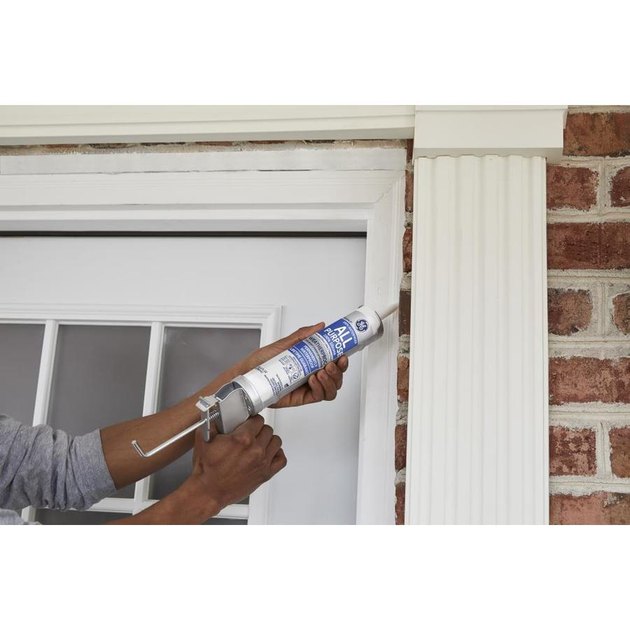
credit: Mike’s Painting & Home Improvement, Inc. Your finger does a better job of tooling than anything else you can use.

Prepare to Caulk Doors and Windows

Whether you’re working indoors or outdoors, you have to remove any existing caulk before you apply fresh material. If you don’t, the new caulk won’t seal properly and it will fail in a short time. You can usually get old latex caulk off with a paint scraper, but silicone caulk is more difficult to remove. You can find products that promise to soften or dissolve silicone and make it easier to remove, but in many cases, you’ll end up cutting a significant portion of the old caulk off with a sharp knife. It’s a tedious job, but you have to do it. Clean up all the loose specks with a damp rag when you’re done.

Cut a caulk tube tip.

If your caulk gun has a cutter, simply insert the tip into the hole in the handle of the caulk gun as far as it will go and pull the trigger. Otherwise, use a utility knife to cut the tip off the tube. It’s best to cut at a 45-degree angle about a third of the way from the tip. This reduces mess: The size of the opening ensures the bead isn’t too large and the angle guarantees that all the material flows into the gap you’re filling. Once you’ve cut the tip, insert a nail or the rod on your caulking tube to break the seal, insert the tube in the gun, pull the trigger a few times until the rod contacts the plunger on the bottom of the tube, and you’re ready to go.

Tips for Efficient Caulking

Once you get the hang of caulking, you’ll find it to be a fairly effortless activity. In fact, the less effort you expend, the better is the job you’ll do. At first, though, you may have to get used to the rate at which material exits the tube so you can adjust the speed with which you draw the gun along the crack. This is why it’s a good idea to start in an inconspicuous spot, such as the top of a door or window frame. Always draw the tip away from the material you just applied. If you push into it, you’ll just get an unsightly and problematic build-up of gooey material.

Whenever possible, apply a bead in a single continuous motion from one end of the gap to the other. Keep steady pressure on the trigger to maintain a uniform flow of material. If you miss a spot or you have to fill a large gap, finish the bead, then go back and apply more in the places that need it. Don’t forget to press the release lever every time you finish a bead. It’s a good idea to wrap a rag around the tip to catch any material that falls out.

Tool each bead as soon as you finish applying it. Simply run your finger—or whichever tooling implement you choose—over the fresh caulk in a single, continuous motion, then wipe the excess material off your finger or the implement with a rag. When you’re using latex caulk, it’s a good idea to keep the rag damp, but use a dry rag when applying silicone, butyl or any other material that isn’t water soluble.

December 27, 2019

Moving Soon? You Need This Checklist

Your wrist may be sore from signing two inches of mortgage documents, but the real fun begins now! You need to transfer your family’s medical records, host a garage sale, discontinue the utilities — oh, and pack up all your earthly possessions and get them from Point A to Point B. It is possible to get it all done without losing your cool: Follow our 8-week timeline to get from “We’re moving!” to “We’re home!”

8 Weeks Before

Sort. Walk through every room and open every drawer; decide what to take to your new home and what to get rid of. Make a list of “keep” items that will require special packing or extra insurance coverage.

Purge. Donate items you no longer want, or host a yard sale.

Hire movers. Research moving companies. Always ask for the mover’s U.S. Department of Transportation license number; whether the company is bonded; and whether the company is licensed for interstate moves, if you’re moving out of state. Request in-home estimates to receive the most accurate pricing.

Contact your children’s school. Notify the school that you’re moving, and obtain copies of your children’s records. Contact new schools for enrollment and record-transfer procedures.

6 Weeks Before

Make travel arrangements. Book hotel stays if you’ll need lodging on the road or before your new home’s ready; book any necessary flights.

Order packing supplies. Purchase standard boxes in various sizes; bubble wrap; packing paper; packing tape; and specialty containers, such as wardrobe and dish-pack boxes.

Contact your doctors. Obtain copies of medical records for all family members, or have the records sent to your new physicians. Haven’t found new ones yet? Ask your current doctors for recommendations.

Contact insurance agents. Find out whether your move necessitates changes in your medical, dental, vehicle or personal property insurance.

4 Weeks Before

Start packing. Begin with items you use only rarely or seasonally (e.g., fondue pot; pool toys); save items you use frequently (e.g., TV remote; your toothbrush) until just before moving day. Snap photos of valuables and pack them separately; you’ll carry those items with you.

Label, label, label. Mark each box with its contents and the room it’s destined for in the new house. The only exception: Don’t list contents on a box that contains valuables, to avoid theft.

Inventory. Keep a running list of each packed box, its contents and what room it belongs in. Later, you can match this against your moving company’s inventory sheet.

Measure. Ensure that all of your belongings can make it out of your old home and into your new one; measure any tall, wide or oddly shaped items, as well as any doorways or tight spaces they’ll need to fit through, so there are no surprises on moving day.

Update your computer. Download any necessary software updates and ensure that all of your files and photos are backed up to an online cloud storage service or an external hard drive that you’ll carry with you.

Make arrangements for pets. Book a pet sitter or care facility for moving day. If you’re moving out of town, make travel plans for your furry friends and ensure your veterinarian has authorized your pets for the journey.

Contact utility companies. Instruct existing utilities to disconnect services the day after your move; direct new utilities to install services at least a day before you arrive.

Consider storage. If your new home won’t be ready when you leave your old one, research storage options in your new community.

Clear the freezer. Start using up frozen food items that will be a hassle to move. Then, tackle the pantry and fridge.

Visit an auto mechanic. Get an oil change, tire fixes and any necessary tune-ups to ensure that your car survives the move.

Change your address. Visit USPS.gov or your local post office to officially change your address. Leave your forwarding address with a neighbor, just in case.

Alert important parties. Notify your employer, banks, credit card companies, subscription services, friends and family of your move.

2 Weeks Before

Confirm the movers. Contact the moving company and double-check your plans. Make sure the insurance in place is enough to cover your valuables.

Clear out. Empty out storage units, safe deposit boxes and any other off-site storage spots. And don’t forget to pick up your dry cleaning.

Take time off. Evaluate how many work days you’ll need to make the move, and then request time off from your employer.

Clean the rugs. Have area rugs cleaned; they’ll arrive rolled and wrapped from the cleaner, ready to unroll at the new house.

Pay it forward. As you pack, gather warranty information, manuals and other house-specific information in a binder for the new owners.

1 Week Before

Finish packing. Aim to complete the general household packing a couple of days before moving day.

Pack your bag. Your last bag should contain at least one change of clothes — or more, if you’re moving out of state — for each person in the family, as well as all of the basics (e.g., phone charger, toilet paper) you need to survive for a few days without the items on the moving truck.

Visit the pharmacy. Refill any prescriptions you’ll need for the next month, and arrange to transfer prescriptions to a pharmacy in your new community.

Unplug. Disconnect and clean any large appliances (e.g., washing machine, fitness equipment) you’re moving; contact a professional to disconnect gas lines. If you’re moving your fridge, defrost the freezer and clean it at least a day before you move.

Make your last donation. Arrange for a final pickup of all remaining items in your “donate” pile.

A Few Days Before

Confirm the movers … again. Triple-check arrangements with the moving company. Verify how much you’ll owe on moving day, and what forms of payment are accepted. Ask for a cellphone number for the day-of contact, and confirm the crew’s arrival time. Prepare written directions to your new home and hand them to the movers on moving day.

Get the keys. Arrange to receive the keys to your new home, or schedule the realtor or landlord to meet you on moving day.

Donate food. If you’d rather move fewer boxes, donate nonperishables to a local food pantry.

Disassemble furniture. Place screws, brackets and fasteners in a small plastic storage bag, and label it. Even better: Tape the bag to the furniture’s underside.

Get rid of it. Most movers prohibit moving boxes that contain paint, aerosol cans, matches, alcohol and other chemicals. Properly dispose of these items, or plan to move them yourself.

The Don’t Pack List

Keep these items off the truck and close to you on moving day:

  • Important documents (e.g., passports, marriage license, birth certificates, any records containing bank account information or Social Security numbers)
  • Checkbook
  • Credit cards
  • Medication
  • Phone and charger
  • Laptop and charger
  • Toilet paper
  • A change of clothes (one for each member of your household)
  • Snacks and water (for kids and pets)
  • A child’s special toy or blanket (if they can’t bear to pack it)
  • Jewelry
  • Flashlight
  • Tape measure
  • Toolbox
  • Trash bags
  • Paper towels
  • Cash
  • Any other valuables, heirlooms or irreplaceable items

Moving Day

Current Home

Say goodbye. Take time to say a proper “so long” to your old house before things get hectic. Children, in particular, benefit from some closure: Walk through the house recalling fond memories you have, and talk about what fun you’ll create in your new home.

Meet the movers. Greet the moving crew and ensure that all workers are representatives of the moving company you hired. Be sure the moving truck’s U.S. Department of Transportation license number is the same as the number on your estimate.

Supervise the load-in. Assign a helper to watch the moving crew stack your belongings inside the truck, keeping an eye out for damage.

Clean the old house. Tidy up rooms as the moving crew empties them, or consider hiring a cleaning service.

Keep valuables with you. Be sure the movers don’t mistakenly load boxes containing your laptop, jewelry, passports and other irreplaceables you should keep near you at all times.

Make a final walk-through. Lock your old home’s windows and doors, turn off lights and ceiling fans and make sure nothing’s left before you leave for good.

New Home

Roll out the carpet protector. Lay down plastic carpet protector at the new house, if your movers haven’t already done so.

Show the moving crew around. Point out specific rooms so boxes end up where they belong.

Watch for damaged and missing items. Your movers will make an inventory sheet, called the “bill of lading,” that notes the condition of your items, including damage to any boxes or furniture.

Pay the movers. Complete the transaction using the payment method you agreed to when you confirmed the move. If the moving crew did a good job, a tip of 10 to 15 percent of the total fee is customary.

Get it in writing. Before the movers leave, sign the inventory sheet — and make sure the mover in charge signs it, too. Get a copy for your records.

Do an initial clean. Vacuum and mop floors before you set down furniture; wipe down countertops; and do a deep clean of tubs, showers and toilets.

Assemble furniture. Grab your toolbox and start reassembling furniture; don’t wait until your helpers have gone home.

Start unpacking. If you notice any damage to your boxes, set them aside until the moving company can return to inspect them. Take photos of the damage for your records.

December 23, 2019

Home Safety for the Holiday Season

The smell of freshly baked cookies and the sight of twinkling lights throughout your neighborhood can only mean one thing – the holiday season is here. Decorating your home, opening stockings by the fire, lighting the menorah, or toasting to the New Year with friends and family are festivities many people look forward to every year. 

While there is plenty of fun to be had during the holiday season, there’s also an increased chance for something to go wrong if you’re not cautious or well prepared. From home fires and snow damage to theft and home burglaries, there are plenty of problems that can arise. Keep these home safety tips in mind this winter so you can be as safe as possible for the festivities to come.

Holiday Light Safety

Few traditions are more beloved than stringing lights throughout your home during the holiday season. While lights can certainly put you in the holiday spirit, they can be one of the most dangerous decorations. In fact, holiday lights are responsible for around 40% of Christmas tree fires. Before decking the halls, consider these precautions:

  • Replace light strands that are old, fraying, or have exposed wires.
  • Never plug more than three strands into one extension cord.
  • Never string together multiple extension cords.
  • Use light clips rather than nails or screws as they can conduct electricity. 
  • Secure loose light strands to avoid pulling or tugging by pets or children.
  • Use LED lights over incandescent lights; they use less energy and are less likely to start fires from emitting too much heat. LED lights can also save money on energy bills.
  • Never run lights through doors or windows.
  • Turn off lights when you leave your home, or be sure to keep lights on a timer.
  • Keep your tree properly hydrated; dry and dying trees are more likely to result in fires.

More often than not, you’ll need to use a ladder if you plan to decorate outdoor trees, the front of your home, light posts, or any other structure far from the ground. When using a ladder to hang outdoor lights:

  • Wear slip-resistant shoes.
  • Choose the proper size ladder; don’t attempt to stand on the top of the ladder or stack one ladder on top of another.
  • Work with a partner to hold the ladder as an extra safety measure.
  • If possible, avoid using metal ladders to prevent an electric shock.

To further prevent accidents during decoration set-up or take-down, consider hiring a professional holiday decorating service in your area. This can be especially helpful if you don’t have the proper tools and equipment to do so yourself. 

Fire Safety 

The risk of home fires is highest during the holiday season, so installing smoke detectors becomes even more critical during this time of year. If you already have these installed, be sure to test them and replace the batteries if needed. Now may also be a good time to upgrade to a smart smoke detector that sends alerts directly to your phone.

Candles

  • Always put out candles if you intend on being out of the room for an extended period of time.
  • Keep decorative candles and/or menorahs at least 3 feet away from flammable objects and out of reach from kids and pets.
  • Never put real candles on Christmas trees. 
  • Ensure candles are placed in a sturdy holder and on flat surfaces.

Heating 

  • Have a professional chimney sweep and furnace inspection annually.
  • Avoid hanging stockings, garlands, or other dangling holiday decorations near heating sources like fireplaces or space heaters while they’re in use.
  • Don’t toss wrapping paper into the indoor fireplace.
  • Ensure your home has a properly functioning carbon monoxide detector near every sleeping area. 

Cooking 

  • Always watch what you are cooking. Unattended cooking is the most common cause of fires in the kitchen. 
  • Have a fire extinguisher in or near the kitchen.

Christmas Trees

  • If you decide to get a live tree, be sure it’s watered sufficiently and frequently. If you opt for an artificial tree, ensure that it’s flame retardant.
  • Place trees as far away from heat sources, such as fireplaces or space heaters, as possible.
  • Once the holiday season has ended, or your live tree becomes too dry or dead, dispose of it right away as it can quickly become highly flammable.

Fireworks 

  • Only light fireworks away from your home and buildings, as well as bushes, trees, or other vegetation.
  • Don’t relight fireworks that fail to explode. 
  • Follow all local laws and regulations. 

Home Security

While the holiday season is supposed to be about spreading joy, theft and burglary rates are known to spike during this time of year. To prevent your home from being a burglar’s next culprit, step up your security game and consider these home safety tips:

  • If your tree is visible from a window, don’t display gifts under it.
  • Make sure you are home for package deliveries if possible. If you can’t be home, consider sending high-value items to the post office instead. 
  • When bringing home gifts, always unload your car in the garage with the door closed and don’t leave gifts in your car overnight. 
  • Make sure doors and windows are always locked and secure.
  • If you’ll be traveling, put lights on timers and let your family members or most trustworthy neighbors know so that they can keep an eye on your property, shovel your driveway, or pick up your newspapers to maintain the impression that someone is home.
  • Never post about travel plans on social media.

If you don’t have a home security system, now may be the right time to invest in one. With the rise in home automation choices available, it’s become easier and more affordable to keep a remote eye on your property. There are plenty of smart home tech devices that can help you keep your home safe and secure this holiday season; such as smart locks, video camera doorbells, and security cameras. If you plan to be away and don’t have someone to look over your home, there’s also smart home lighting, thermostats, and sprinkler systems that can be controlled from anywhere. 

Cold Weather Safety: Winterize Your Home 

Snow may be beautiful, but the winter months can be a hazard for your loved ones and your home if you’re not careful. Icy driveways, ice dams, and frozen pipes are just a few problems that can arise. Before the deep chill of winter sets in, be sure to winterize your home.

  • Swap out screens for storm windows, and be sure to seal gaps around doors and windows with weather stripping.
  • Clean up debris around the landscape of your home as well as the roof.
  • Check all exterior vents and be sure they’re closed.
  • Prevent ice dams from forming on your roof by minimizing the amount of snowmelt; clean your gutters and keep your attic cool and ventilated. Icicles can be a sign that an ice dam is forming.
  • Carefully remove icicles that are within reach; if they’re too high up or don’t easily knock off, hire a professional to remove them to avoid potential injuries. 
  • Keep your driveway and sidewalk clear by shoveling off snow, or using a snowblower, and applying a deicer. 
  • Drain all remaining water from outdoor faucets or sprinkler systems to protect your pipes from freezing.  

Your habits on the road matter in the winter, too. Prepare your car by ensuring you have snow brushes and ice scrapers, and consider putting salt or kitty litter in the trunk in case you encounter icy driveways or roads. Make sure to stock your vehicle with all the staples, such as first aid kits, road flares, and a jack. If you’re concerned about breaking down in the cold, store a few extra blankets and coats as well. For those in areas prone to very heavy snowfall, such as Minneapolis, don’t forget about snow tires and chains. 

December 20, 2019

END OF THE YEAR LAWN & GARDEN TIPS

Bird feeders bring lots of colorful activity to a yard in cold weather. Most bird experts recommend black oil sunflower seed for general feeding. Thistle seed and suet cakes attract birds you might not have seen before. Put out a variety of seeds and keep watch for unique species.

Rather than a bottle of wine, bring a houseplant as a gift to holiday parties. Amaryllis, ornamental pepper, Christmas cactus, or kalanchoe will be appreciated for weeks to come.

Pull mulch at least six inches away from tree trunks. Many professional landscapers pile it high and don’t pull it back—setting a bad example for all of us.

Water trees and shrubs you planted this fall. Evergreen plants in particular need regular watering, even in cold weather. Apply 1 gallon per foot of height.

Don’t leave your lawn mower out in the rain. Water can get in the gas tank and prevent starting next spring. It is best to drain the tank completely or run the mower until it is out of gas. Always use ethanol-free gas in small engine machinery.

Purchase pots of paperwhite narcissus, African violet, or gloxinia for your office and home to bring color and a touch of perfume to the air.

Forget the powders and potions! What a Christmas tree needs to stay fresh is a constant supply of water around its base.

Plant woody vines like Carolina jessamine, wisteria, and cross vine now. Make sure to place them next to a sturdy arbor and loosely tie the young vine to it with twine.

Houseplants don’t need many nutrients in the winter. Use houseplant fertilizer at half strength. Don’t water them unless the soil feels dry one inch deep.

Remove the faded blooms and bloom stalks from amaryllis but allow the leaves to remain. Water only when the soil feels dry.

Fireplace ashes can be scattered over your lawn. They will provide a bit of phosphorus and potassium plus counteract soil acidity. Spread no more than ten lb. per 1000 square feet every six months.

December 16, 2019

CHOOSING NATURAL FIBERS FOR RUGS AND CARPETS

Rug Fibers Derived from Plants

Sisal

Sisal is an extremely long, strong, and durable natural fiber harvested from the leaves of the agave plant. The stiff fibers of this eco-friendly option are spun into yarns, which are woven into rugs and carpets.

Naturally tan, beige, or cream-colored, sisal fiber readily absorbs dyes, resulting in rugs and carpets in nearly any color. However, this trait also means they can stain easily.

Tough? Yes! Soft? Not so much. Sisal isn’t the best choice for lounging on the floor or play-time for little ones, due to its scratchy, prickly texture.

Cat owners may find that their kitties like to sharpen their claws on this fabric, which will snag it.

Due to its strength and durability, sisal is an excellent choice for high-traffic areas, including halls, entrances, and commercial office spaces.

Jute

One of the most affordable natural options, jute is a soft fiber with extremely high tensile strength, natural luster, and uniformity. It is harvested from the tall stalks and outer layers of the fast-growing jute plant.

Also known as “burlap” or “gunny cloth,” jute is grown in many countries. However, most of the world’s supply originates in India and Bangladesh.

The long fibers (three to 13 feet) are strong, eco-friendly, biodegradable, and recyclable. Unlike some natural fibers like cotton, jute doesn’t require fertilizer or pesticides during cultivation.

Jute is also called “the golden fiber,” due to its natural shade of light tan. It can, however, be dyed into many other colors.

One of the softest natural fibers, jute is best suited for bedrooms, family rooms, and lighter traffic areas.

One potential negative is that jute fibers may shed. They’re also vulnerable to yellowing when exposed to direct sunlight.

Seagrass

Seagrass fiber is harvested from—you guessed it—grass planted in paddy fields flooded with seawater!

This fiber is naturally water-repellent but is susceptible to mold and mildew damage if used in damp areas like bathrooms or kitchens.

Seagrass is stain resistant, making it an excellent choice for spill-prone areas and for folks who are housetraining pets. Seagrass’ stain resistance also means it’s nearly impossible to dye and is only available in its natural light tan color.

Seagrass fibers won’t fade in direct sunlight. It’s anti-static and sturdy but offers minimal cushioning.

Coir

Coir is a natural fiber harvested from coconut husks. The longest fibers are selected, soaked (for months!), and eventually woven into yarn that is used to make rugs and carpet.

Rough and bristly, coir is not recommended for use in areas where people will sit on the floor, walk barefoot, or where children may be playing. Extremely durable and naturally insect repellant, coir is well suited to high-traffic areas.

Coir rugs are usually handmade and provide excellent noise insulation. They will, however, fade in direct sunlight and tend to shed over time.

Coir is not as mainstream as other natural carpet fibers, so it may not be easy to source.

Rug Fibers Originating from Animals

Wool

One of the most durable natural fibers, wool is harvested by shearing sheep.

Wool fiber is often chemically treated during manufacturing, so research your brand and check labels. Organic and chemical-free wool rugs and carpets are also available.

It’s an excellent insulator that limits the transfer of heat and cold from interiors to exteriors. Like your favorite pair of merino socks or base layer shirt, wool carpeting will help keep your home warm in the winter and cool in the summer, naturally.

Wool can be dyed in an unlimited range of colors and shades. Because it’s easy to dye, it’s also easier to stain with dye-like substances (red wine, juice, tomato paste, etc.). Otherwise, wool is naturally soil resistant and repels the oily stains other fibers tend to attract.

Wool is also naturally flame retardant. However, it will fade in direct sunlight. Plus, it’s expensive and requires special handling. For instance, many cleaners are too harsh for wool and, since it retains water, wool is prone to mildew.

Aside from the cost, wool wears exceptionally well and resists “crushing.” With proper care, it will usually outlast its synthetic counterparts and look great for years—even decades!

Silk

Silk is a natural fiber harvested from the silkworm larva’s cocoon. This is the most expensive natural fiber used in rugs and carpets. Because it is so pricey, silk is sometimes woven with wool to lower the cost.

Pure, 100-percent silk carpets and rugs are luxury goods with a material-defining sheen, a delicious softness, and a delicate temperament.

Silk rugs can be damaged by hot water, detergents, steam cleaning, and vacuums that use revolving brush attachments.

Costly, delicate, and easily stained, silk rugs are best suited for low-traffic areas. They are often hung on walls rather than being placed underfoot.

Other Considerations

Often, two or more natural fibers are combined in rug and carpet production, intended to deliver the best qualities of each strand or reduce costs. Online reviews for specific products may give you a better sense of buyer satisfaction.

If you are interested in natural fibers to avoid the toxic fumes that occur from the “off-gassing” of volatile organic compounds, make sure the manufacturing process does not introduce potentially dangerous dyes and chemical treatments. Also, be sure your installation uses non-toxic padding and non-toxic adhesives.

December 12, 2019

WHAT TO REPAIR BEFORE YOU LIST

When you’re getting ready to list your home, it’s of the upmost importance to ensure you are showing it in the best light. Taking time to highlight its strengths and fix up some of its possible weaknesses can make a big difference in how fast it sells. Here are our top five recommended repairs to make before selling your home.

Repaint walls.

Giving your home a fresh coat of paint is one of the most cost-effective ways to spruce it up, and generally, it can be a do-it-yourself project. Make sure cover any walls with scratches and chips and consider updating any accent walls with a more neutral coat.

Repair floors.

Hardwood floors are a very desirable feature in a home, so you want to ensure they look their best by fixing scratches or dull areas. If your carpet is worn or stained, consider replacing them. And don’t forget the tile in your kitchen or bathrooms. Re-grouting can go a long way in making dingy tile work look brand new!

Refresh the landscaping.

Show buyers your home is the full package by dressing up the outside as well as the in. Clean walkways and driveways, plant seasonal flowers and plants, trim hedges and trees, install outdoor décor pieces and fill in mulch and gravel.

Fix your fixtures.

Leaky faucet? Rusted drains? Loose drawer handle? Making these small fixes can make a big difference to potential buyers with detailed-orientated minds. Improve your kitchen. An outdated kitchen can be a real eyesore in a home. Updating cabinetry, repairing or replacing countertops, and installing new faucets and sinks may be worth the investment

December 2, 2019

Local Christmas Tree Lightings & Events

Tree Lighting + Movie – 100 South Hill Street in Griffin – 12/6/19 – 6pm-9pm
RSVP: https://www.facebook.com/events/1666209093514949/
THE LIGHTING OF CONCORD
12/6/19
at R. F. Strickland Company
Hosted by: L’s Art: A Mobile Studio
Its that time of year again… Christmas time!
What to expect at this free event:
-Santa arriving by helicopter at 6:30p.m.
-The Grinch causing trouble…I just know it.
– Me helping you create a gingerbread house for the holiday (as a gift or just for you)
RSVP: https://www.facebook.com/events/652035258661240/
Celebrate the Season at Locust Grove’s Annual holiday parade, craft fair, and festival!

The event kicks off with the parade down Hwy 42 at 10:00 AM. After the parade, shop for one of a kind, handmade gifts at the craft fair, and enjoy FREE festive family fun including costumed characters, face painting, petting zoo, kids activities, live performances, and more!

We’ll also be having an AWESOME prize raffle to benefit Locust Grove Main Street’s mission to preserve, promote, and revitalize our historic downtown!.

This year’s Christmas in the Grove is brought to you in part by our friends at Piedmont Henry Hospital and Ameris Bank. Thank you!

RSVP: https://www.facebook.com/events/2855891707754672/
RSVP: https://www.facebook.com/events/730567517446535/
RSVP:
https://www.facebook.com/events/3166656860016835/
https://www.facebook.com/events/853660575048731/
https://www.facebook.com/events/449634449071342/
Tree Lighting – Milner City Park – 101 Pecan Drive – 12/12/19 – 6:30pm-8pm
Come and help us kick off the Christmas Season!
Lighting of the Christmas Tree!
Santa Claus will be there and another BIG surprise!
Bring the kids!
RSVP: https://www.facebook.com/events/2563653233753357/
Saturday, December 14, 2019 at 2 PM – 7 PM
RSVP: https://www.facebook.com/events/2479461105671474/